
POS Payments
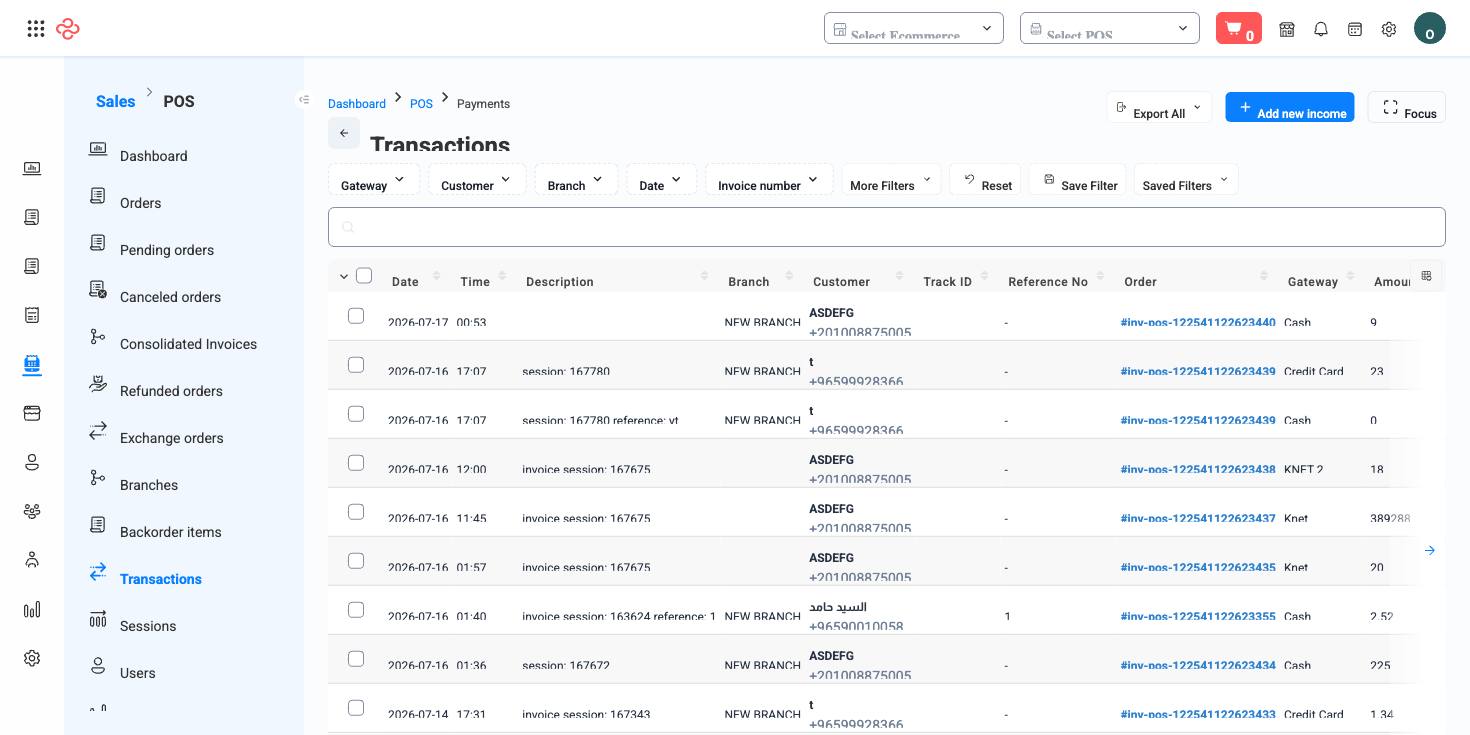
Every dinar, riyal, or card tap collected at a register is recorded here as an individual payment. While Orders shows what was sold, Payments shows how it was paid - one row per payment, with its method, amount, and the order and session it belongs to. This is the page for following the money.
Menu path: Sales > POS > Payments
URL: https://my.ososs.com/dashboard/pos/payments
How POS payments work
A single order can carry more than one payment - a customer splits the bill between cash and card, for example - so payments are stored as their own records rather than as a single field on the order. Each payment knows:
| Detail | Why it matters |
|---|---|
| Method (cash, card, ...) | Lets you reconcile each payment channel separately |
| Amount | The exact figure collected for that payment |
| Order | Links the money back to what was sold |
| Session | Ties the payment to the shift and drawer it entered |
This granularity is what makes reconciliation possible. Cash payments roll up into the session's expected drawer balance; card payments roll up into the total you should see on the card terminal's settlement report. When either does not match, the payment-level detail here is where you find the odd one out.
Reading the list
The list carries the standard OSOSS tools: manage columns via the icon at the right of the header row, saved filters, focus mode, and rows-per-page with a page jumper. Filter by date, branch, or session to isolate the slice of payments you are checking, and open any row for the payment's full details.
Reconcile card payments against the terminal
- Go to Sales > POS > Payments and filter to the day and branch.
- Narrow the view to card payments.
- Compare the total with the card terminal's end-of-day settlement report.
- If they differ, scan the individual payments for a duplicate, a missing entry, or a payment recorded under the wrong method.
Export the current view
- Apply your filters and select the columns you want (manage columns).
- Press Export All - the export respects current filters and column selection.
A month of exported payments, grouped by method, is the raw material for questions like "how much of our register revenue is still cash?" - useful when deciding whether a branch needs a second card terminal.
What you can do on this page
Every action on this page, step by step. What you see depends on your role, so a control your account is not set up for simply does not appear.
Open and read a record
- Click the row, or choose View in the row's actions menu.
- The detail page shows the record's own fields, its related documents, and the actions that apply to it in its current state.
- Use the breadcrumb or your browser's back button to return - your filters, sort, and page position are preserved.
Export the list
- Filter and choose your columns first - the export mirrors exactly what is on screen, not the whole table.
- Click Export All.
- The file downloads as a spreadsheet: one row per record, your visible columns in your order.
Full reference
Every option and control on this page, at a glance.
Standard list tools
Every list page in OSOSS shares these controls:
- Manage columns - the icon at the right edge of the header row: search columns, tick to show or hide, drag to reorder. Your selection persists for your user.
- Quick search - matches the page's primary field.
- Filter chips + More Filters - the chips are your defaults; More Filters exposes the full set below.
- Save Filter / Saved Filters - name a filter combination and recall it in one click; one can be your default view.
- Reset - clears filters back to defaults.
- Export All - downloads the current filtered rows with exactly the columns you have selected.
- Focus - hides the surrounding chrome for a full-width table.
- Row selection - the header checkbox selects the page or all matching rows, enabling bulk actions.
- Rows per page and page jumper - at the foot of the table.
- Custom fields - anything you define under Settings > Custom Fields appears here as both a column and a filter.