
Invoices
An invoice is the financial record of a sale. In OSOSS, every sale - whether it happens at the register, on your website, through the mobile app, or via the API - produces an invoice, so this screen is the single place to follow everything your business bills and collects.
Menu path: Sales > Invoices > Invoices
URL: https://my.ososs.com/dashboard/invoices
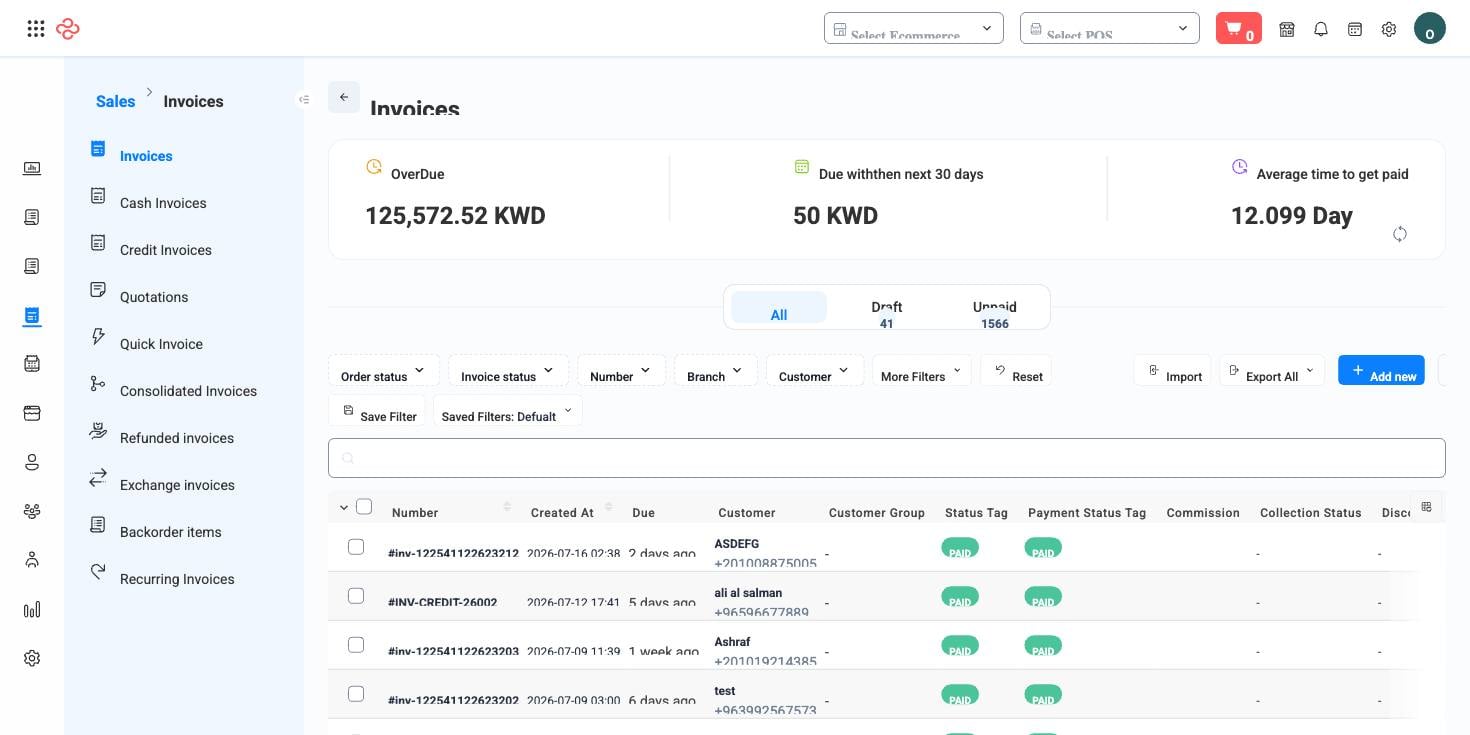
How invoices work in OSOSS
Invoices and orders are two views of the same record. The order view (Sales > Orders) focuses on fulfillment - picking, dispatching, delivering. The invoice view focuses on money - amounts, payments, and balances. When a cashier completes a POS sale, the invoice is created and paid in one step. When a website order comes in, the invoice may start unpaid and collect its payment later, on delivery or through a payment link.
Each invoice tracks two independent things:
| Aspect | States |
|---|---|
| Order status (fulfillment) | Opened, Processed, Dispatched, Delivered, Fulfilled, On hold, Canceled |
| Payment status (money) | Paid, Unpaid, Partially paid, Overdue (past its payment-due date) |
Reading the list
The default view shows: number, created date, due, customer, customer group, status tag, payment status tag, driver commission, collection status, discount, amount, paid, unpaid, payment date, shipping method, and shipping address. Use the manage-columns icon (right edge of the header row) to add any of the 40+ other columns - including the five UTM marketing-attribution columns (Campaign, Source, Medium, Term, Content) that reveal which ad or link produced each sale, per-payment detail, and per-line-item detail.
The quick search box matches the invoice number. Beyond it, 47 filters cover every angle: branch, POS session, seller, customer or customer company, payment gateway, coupon, platform, delivery window, geography (country/city/area), driver, ETA status, and more. Build a combination you use often, then press Save Filter to keep it one click away.
Working with a single invoice
Each row carries the full lifecycle of actions. What you see depends on the invoice's current state and your permissions:
| Action | What it does |
|---|---|
| Advance status (blue button) | Moves the order along Opened, Processed, Dispatched, Delivered, Fulfilled |
| View | Opens the invoice detail with items, payments, and history |
| Edit | Opens the invoice for changes; a lock icon with a tooltip appears when editing is blocked (for example, after fulfillment) |
| Send | Sends the invoice to the customer by email, SMS, or WhatsApp |
| Payment links | Generates an online payment link the customer can pay remotely |
| Record payment | Registers a full or partial payment against the invoice |
| Print / Receipt | A4 invoice print or thermal receipt format |
| Refund | Starts a refund - see Refunded Invoices |
| Exchange | Starts an item exchange - see Exchange Invoices |
| Cancel | Voids the invoice |
Behind these buttons the system enforces the money rules: you cannot mark an unpaid invoice Delivered without the Record Payment dialog appearing first, and driver-delivered invoices route through driver assignment, commission payment, and cash collection steps automatically.
Create an invoice manually
Most invoices arrive on their own from POS and the website. Create one manually when you bill outside those channels - a phone order, a wholesale deal, a service job.
- Go to Sales > Invoices and click Create.
- Choose the customer (or add one inline), branch, and currency.
- Add line items by searching products; adjust quantity, price, and per-line discount.
- Set the invoice date and payment due date - the due date drives the Overdue indicator and aging on the Invoices dashboard.
- Save. Then either Record payment immediately or Send it with a payment link.
Collect payment
- In person: open the invoice, choose Record payment, pick the method (cash, KNET, card, ...) and amount. Partial amounts are allowed; the unpaid balance stays visible on the list.
- Remotely: row menu, Payment links, share the generated link by any channel. When the customer pays online, the payment status updates automatically and the transaction appears under Accounting > Online PG Transactions.
Bulk operations
Select multiple rows (or all rows matching the current filter) to bulk print in Arabic or English - each language produces a print-ready file of all selected invoices. Export All downloads the current filtered view with exactly the columns you have selected.
What you can do on this page
Every action on this page, step by step. What you see depends on your role, so a control your account is not set up for simply does not appear.
Actions on a single record
These appear in the row's actions menu and on the record page, and only when the record's current state allows them:
- Assign Invoice To Driver - hands the order to a delivery driver, who then sees it in the driver app.
- Cancel - voids the document while keeping it on file for audit; stock and balances it touched are released.
- Create Consolidation Invoice - merges the selected documents into one consolidated invoice.
- Delivered - sets the delivery state to delivered.
- Dispatched - sets the delivery state to dispatched/out for delivery.
- Fulfill - marks the order as delivered/completed and commits the stock movement.
- Fulfill Paid Invoice - fulfills only invoices that are already fully paid - useful as a bulk step at end of day.
- Mark As Paid - settles the document without going through a payment gateway; use it for cash or off-system payment.
- Pay Commission - records the vendor's or agent's commission payout for this document.
- Processed - moves the record to processed.
Export the list
- Filter and choose your columns first - the export mirrors exactly what is on screen, not the whole table.
- Click Export All.
- The file downloads as a spreadsheet: one row per record, your visible columns in your order.
Print or save as PDF
- Choose Print in the row's actions menu, or open the record and use Print there.
- Pick the template or format if you are prompted.
- Your browser's print dialog opens - print it, or choose Save as PDF as the destination.
Full reference
Every option and control on this page, at a glance.
List columns
Shown by default: Format number, Created at, Due, Customer, Customer group, Status tag, Payment status tag, Driver commission, Collection status, Discount, Amount, Paid, Unpaid, Incomes - date, Shipping method, Shipping address
Also available: Barcode, Currency, Currency code, Delivery datetime, Delivery tag, Delivery type, Driver, ID, Invoice number, Is commission paid, Is delivery, Is paid, Is returned, Note, Order status, Order status tag, Payment gateway, Payment method, Platform name, POS session ID, Purchase order, Seller, Source, Status, Type, UTM campaign, UTM content, UTM medium, UTM source, UTM term, VAT number
Expandable column groups: Customer, Incomes, Items - Each group expands to its own sub-columns in the manage-columns dialog.
Filters (46)
- Identity and numbering: Academic year ID, Barcode, Branch ID, Consolidation invoice ID, Coupon ID, Customer company ID, Customer ID, Driver ID, Format number, Gateway ID, ID, Ids, Not in consolidation invoice, Number, Order number, Paid, Payment ID, POS branch ID, POS session ID, POS user ID, Product ID, Shipping method ID, Track ID, User ID
- Dates and periods: From date, From delivery date, From delivery time, From payment due, Invoice date, To date, To delivery date, To delivery time, To payment due
- Money and payment: Collection status, Payment status, Same company currency
- Location and delivery: Area, City, Country
- Status and flags: ETA status, Has extra expenses, Order status, Platform, Source, Status
- Other: Purchase order
Dialogs and drawers
- Payment Links Modal
Record actions
- Assign Invoice To Driver
- Cancel
- Create Consolidation Invoice
- Delivered
- Dispatched
- Fulfill
- Fulfill Paid Invoice
- Mark As Paid
- Pay Commission
- Processed
Sortable columns
Delivery date time, Delivery tag text, Order status tag, Payment status tag text
Standard list tools
Every list page in OSOSS shares these controls:
- Manage columns - the icon at the right edge of the header row: search columns, tick to show or hide, drag to reorder. Your selection persists for your user.
- Quick search - matches the page's primary field.
- Filter chips + More Filters - the chips are your defaults; More Filters exposes the full set below.
- Save Filter / Saved Filters - name a filter combination and recall it in one click; one can be your default view.
- Reset - clears filters back to defaults.
- Export All - downloads the current filtered rows with exactly the columns you have selected.
- Focus - hides the surrounding chrome for a full-width table.
- Row selection - the header checkbox selects the page or all matching rows, enabling bulk actions.
- Rows per page and page jumper - at the foot of the table.
- Custom fields - anything you define under Settings > Custom Fields appears here as both a column and a filter.