
Products
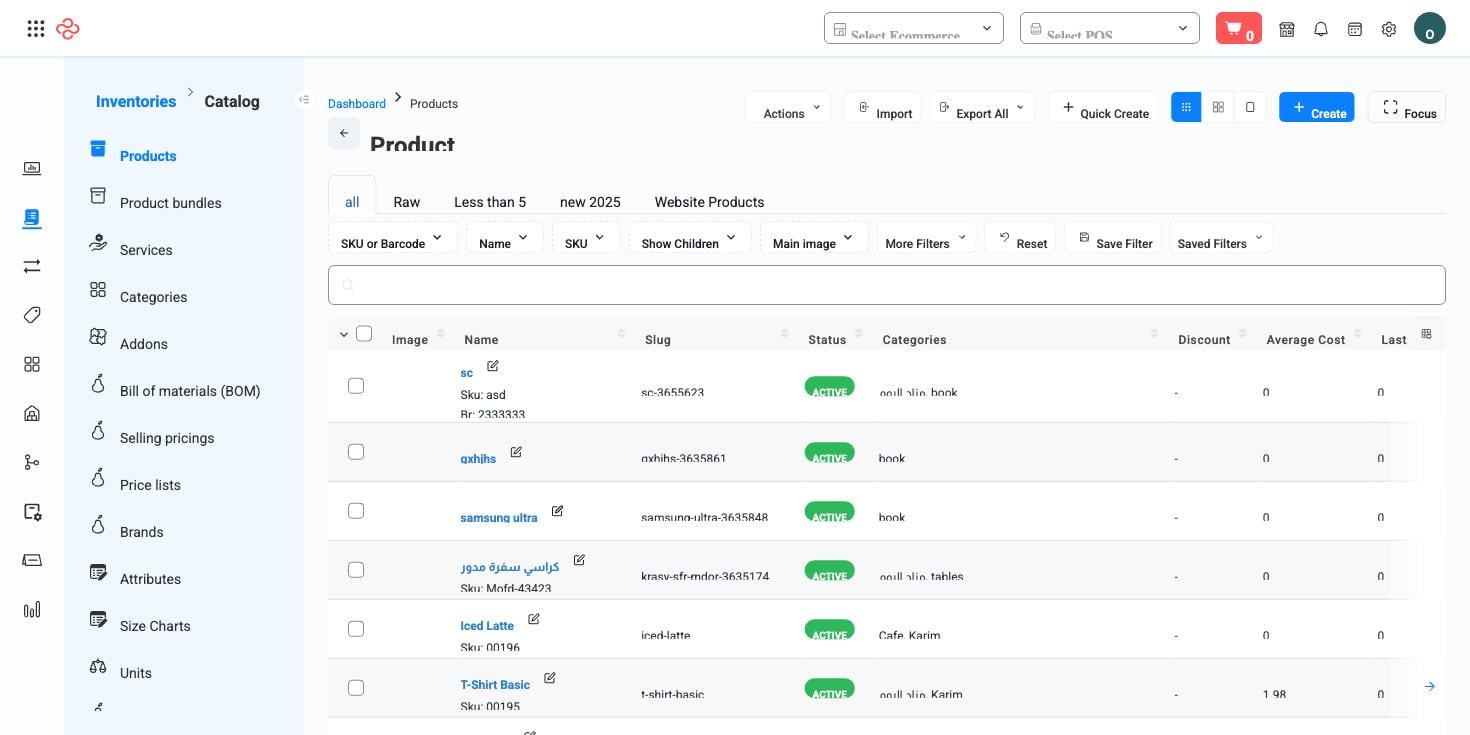
Products is your catalog - the master list of everything you sell, powering POS, the website, and the mobile app from a single record. It is the largest and most capable page in OSOSS.
Menu path: Inventories > Products
URL: https://my.ososs.com/dashboard/products
Product types
| Type | Use for |
|---|---|
| Inventory | Physical stock-tracked goods |
| Non-inventory | Goods sold without stock tracking |
| Service | Appointments, consultations, work |
| Configurable | A parent with variants (size/color children) |
The product form: six tabs
- Main - name (bilingual), slug, descriptions, price, type, SKU, barcode (with unique-barcode-per-item option), unit, categories, brand, vendors, HS code, weight, images/video gallery, addons, ingredients handling, discount, and event fields for event products.
- Store / Mobile App / POS - three channel tabs, each overriding label, descriptions, availability, backorder, stock display, try-on (Store), note field, and min/max cart quantities per channel. One product, tuned per channel.
- SEO - meta title/keyword/description and OG tags (see Product SEO for bulk editing).
- Accounting - sell/buy toggles and the income, expense, and asset accounts the product posts to.
Create a product
- Go to Inventories > Products and click Create (or use Quick Add for name-price-category-barcode in seconds).
- Fill the Main tab; switch to Basic/Advanced mode as needed.
- Set channel availability on the Store/App/POS tabs.
- Save. Stock is managed separately in Inventories.
Variants (configurable products)
- Create the parent as type Configurable and assign attributes (e.g. Size, Color) - see Attributes.
- Run the children generator - it creates every combination as child products.
- Adjust per-child price/barcode; use Apply to children to push a parent change to all variants at once.
Product detail view
Opening a product (rather than editing it) shows a read-oriented detail page built for quick assessment:
- KPI stat cards - the product's key numbers at a glance (stock, sales, cost/price position).
- Image carousel - all product media in a browsable strip.
- Main details panel - the core fields without the full edit form's density.
- Tabbed sections - detail areas grouped by topic, so stock, pricing, and channel data each have their own tab.
- Action buttons - jump straight to editing, printing a barcode, or viewing stock transactions.
- Recalculate alert - appears when the product's computed quantity may be stale, with a one-click recalculate.
Working the list
Table or grid view (cards with images). Quick search matches SKU, barcode, or name. 71 filters cover type, availability, channel enablement, quantity/price ranges, vendor, expiry, SEO status, and more. Row actions include edit, stock transactions, print barcode, and archive/restore - archive retires a product without deleting its history.
Bulk edit updates many products at once: prices, costs, discounts, categories, brand, accounts, images, SEO fields, and channel toggles. Excel import (with validation review) and export round out mass operations.
What you can do on this page
Every action on this page, step by step. What you see depends on your role, so a control your account is not set up for simply does not appear.
Add a record
- Click Add above the table - some pages label it New or show a + icon.
- Complete the form. Required fields carry a red asterisk and the form will not submit until they are filled.
- Click Save. Validation runs on submit; any field that fails shows its message directly beneath itself, and the form scrolls to the first problem.
- You land back on the list with the new record in place.
This form carries 108 fields, grouped into sections and tabs so you meet them a few at a time. Only the required ones block saving - fill those, save, then come back and enrich the record. Every field is listed under Form fields in the reference below.
Edit a record
- Open the row's actions menu at the end of the row and choose Edit, or open the record and use Edit there.
- The form loads with current values. Change only what you need.
- Click Save.
Delete a record
- Open the row's actions menu and choose Delete.
- Confirm in the dialog. There is no undo from the interface.
- If the record is referenced elsewhere - used on a document, tied to a transaction - the delete is refused and the reason shown.
Actions on a single record
These appear in the row's actions menu and on the record page, and only when the record's current state allows them:
- Archive - moves the record out of the active list without deleting it; find it again with the archived filter.
- Clone Images Between Siblings - copies images across the variants of the same product.
- Deduct - posts a deduction against the record.
- Delete - removes the record, subject to the reference check above.
- Delete Broken Image Urls - clears image links that no longer resolve.
- Discover Images - scans linked sources for product images and attaches what it finds.
- Enable In Pos - makes the item sellable in POS.
- Enable In Store - publishes the item to your online store.
- Recalculate Quantity - recomputes stock on hand from the underlying transactions - run it after a correction.
- Restore - brings back a soft-deleted record with its data intact.
- Review Import - reopens the import result for inspection.
- Unarchive - returns an archived record to the active list.
- Update - applies an in-place update to the record.
Export the list
- Filter and choose your columns first - the export mirrors exactly what is on screen, not the whole table.
- Click Export All.
- The file downloads as a spreadsheet: one row per record, your visible columns in your order.
Print or save as PDF
- Choose Print in the row's actions menu, or open the record and use Print there.
- Pick the template or format if you are prompted.
- Your browser's print dialog opens - print it, or choose Save as PDF as the destination.
Full reference
Every option and control on this page, at a glance.
Filters (69)
- Identity and numbering: Barcode, Bill ID, Branch ID, Brand ID, Category ID, Exact barcode, External ID, Has barcode, ID, Parent ID, Pickup rule ID, Product barcode, Shipment barcode, Shipment number, SKU, SKU or barcode, SKU or barcode or name, Unit ID, Vendor ID, Vendors ID
- Dates and periods: Created from date, Created to date, Deleted from date, Deleted to date, Enable in store, Event end, Event register end, Event register start, Event start, Expiry date, Has receive quantity after date, InventoryTransactions, Last date, Out of stock, Products - enable quantity in store
- Money and payment: Price greater, Price less
- Products and stock: Attributes, Attributes values, Enable backorder, Has enabled ingredients, Order by category, Product kind, Quantity greater, Quantity less
- Status and flags: Active shop, Disable in, Enable in, Enable registration event, Event status, Has sub type, Is available, Not type, SEO status, Show deleted only, Sub type, Type, Type or children type, With has children
- Other: Conditions, Main image, Main only, Name, Not configurable, Only parents, Producible, Sell this, Show children, Show note field
Form fields (108)
Active, Addons, Asset account, Attribute ID, Attributes, Barcode, Body, Brand ID, Buy this, Categories, Category ID, Comment, Currencies, Custom data - available seats, Custom data - end date, Custom data - end registration date, Custom data - location, Custom data - location detail, Custom data - location type, Custom data - location url, Custom data - min seats, Custom data - redirect to checkout, Custom data - start date, Custom data - start registration date, Custom data - term and condition, Description, Discount, Discount amount, Discount type, Enable backorder, Enable quantity in store, Enable try on, End date, Expense account, External ID, Extra cost, Has quantity, Has unique barcode per item, Hs code, Images, Include shipping amount, Income account, Ingredient ID, Ingredients handling, Lang, Long description, Maximum quantity in cart, Maximum quantity in cart unit ID, Meta description, Meta keyword, Meta title, Minimum quantity in cart, Minimum quantity in cart unit ID, Minimum subtotal, Name, Notification channels, Og description, Og image, Og title, Other inputs - ETA code, Other inputs - ETA type, Parent ID, Parent inventory product ID, Payment methods, Platforms - mobile app - description, Platforms - mobile app - enable backorder, Platforms - mobile app - long description, Platforms - mobile app - name, Platforms - POS - description, Platforms - POS - enable backorder, Platforms - POS - enable in microstore, Platforms - POS - enable quantity in store, Platforms - POS - long description, Platforms - POS - maximum quantity in cart, Platforms - POS - minimum quantity in cart, Platforms - POS - name, Platforms - store - enable in microstore, Platforms - store - name, Price, Product ID, Purchase unit ID, Rating, Redeem description, Redeem sales channels, Redeem title, Redeem type, Redeem type ids, Related quantity, Sales channels, Sell this, Show note field, Slug, Start date, Status, Store ID, Sub type, Title, Type, Unit ID, Uses per coupon, Uses per customer, Validity period, Value, Value ID, Vendor ids, Visibility value, Wastage, Weight
Dialogs and drawers
- Apply To Children Modal
Record actions
- Archive
- Clone Images Between Siblings
- Deduct
- Delete
- Delete Broken Image Urls
- Discover Images
- Enable In Pos
- Enable In Store
- Recalculate Quantity
- Restore
- Review Import
- Unarchive
- Update
Sortable columns
Ave cost, Categories, Invoices sold quantity, Quantity
Standard list tools
Every list page in OSOSS shares these controls:
- Manage columns - the icon at the right edge of the header row: search columns, tick to show or hide, drag to reorder. Your selection persists for your user.
- Quick search - matches the page's primary field.
- Filter chips + More Filters - the chips are your defaults; More Filters exposes the full set below.
- Save Filter / Saved Filters - name a filter combination and recall it in one click; one can be your default view.
- Reset - clears filters back to defaults.
- Export All - downloads the current filtered rows with exactly the columns you have selected.
- Focus - hides the surrounding chrome for a full-width table.
- Row selection - the header checkbox selects the page or all matching rows, enabling bulk actions.
- Rows per page and page jumper - at the foot of the table.
- Custom fields - anything you define under Settings > Custom Fields appears here as both a column and a filter.