
All Orders
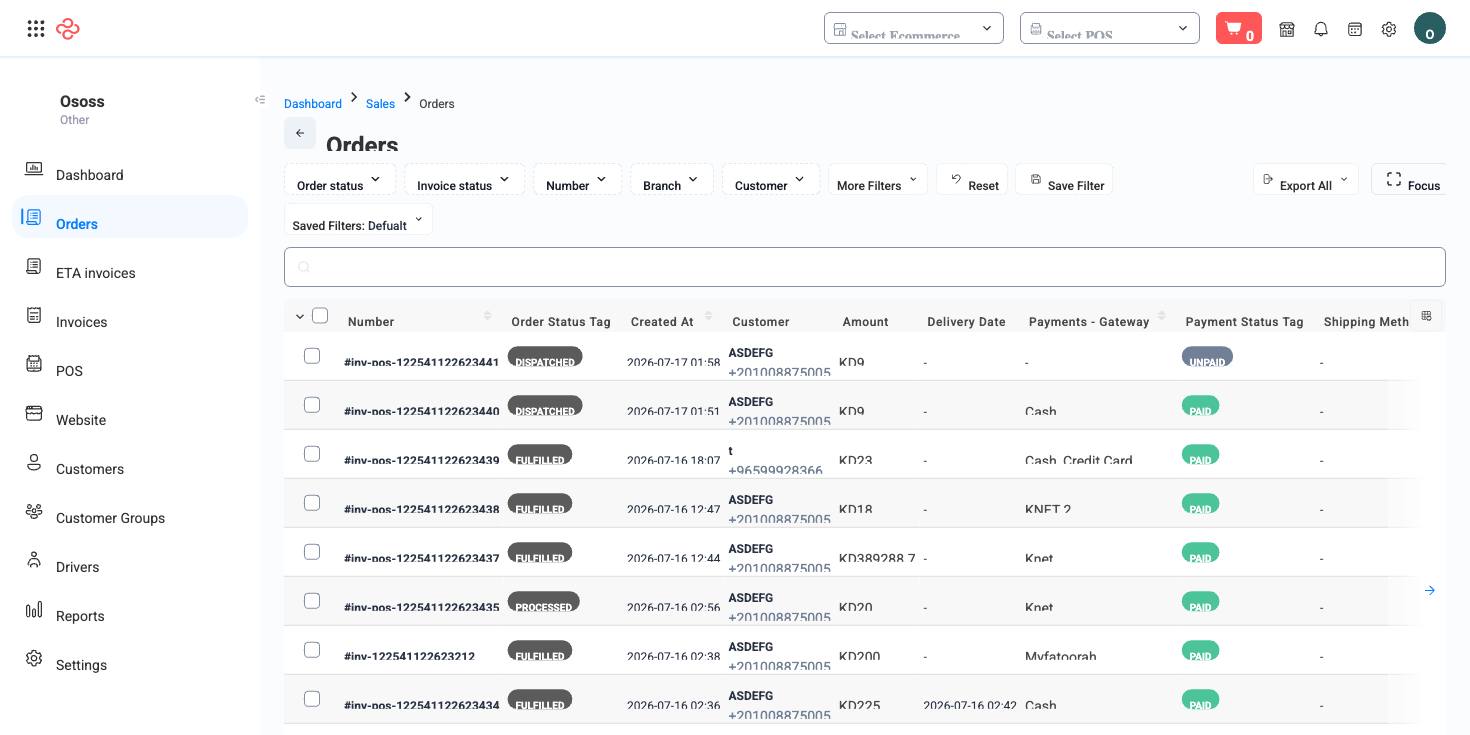
All Orders is your fulfillment command center. Where the Invoices screen follows the money, this screen follows the goods: every order from every channel - POS, website, mobile app, and API - lands here, and you move each one through its lifecycle until it reaches the customer.
Menu path: Sales > Orders > All Orders
URL: https://my.ososs.com/dashboard/sales/all-orders
How the order lifecycle works
Every order travels a fixed path, and the status tabs across the top of the list mirror it. Each tab is a live work queue - the number of orders waiting in each stage is visible at a glance:
| Status | Meaning |
|---|---|
| Opened | Just received; nobody has started on it yet |
| Processed | Picked and packed, ready to leave |
| Dispatched | Out for delivery (with a driver or a shipping company) |
| Delivered | Handed to the customer |
| Fulfilled | Closed and complete - payment and delivery both settled |
| Refunded | Money returned after the sale |
| On hold | Paused deliberately (stock issue, customer request, payment check) |
| Canceled | Voided before completion |
| All | Everything, regardless of state |
The blue advance button on each row moves the order to its next stage, so a fulfillment team can work the Opened tab down to zero, then the Processed tab, and so on. Because orders and invoices are two views of the same record, advancing an order here updates its invoice everywhere else.
Working the queues
- Open the tab for the stage your team handles (for example, Opened for the picking team).
- Open a row to review its items, customer, and shipping address.
- Prepare the order, then press the advance button to push it to the next stage.
- For deliveries, assign a driver - the order then carries its driver, commission, and collection status through to Fulfilled.
Reading and filtering the list
The standard list tools apply: manage columns via the icon at the right of the header row, saved filters, focus mode, rows-per-page, and a page jumper. Among the optional columns are the five UTM attribution columns (Campaign, Source, Medium, Term, Content), which tell you which ad, email, or link produced each order - add them once and save the view.
Bulk printing and export
Select multiple rows (or everything matching the current filter) to bulk print order documents in Arabic or English - each language produces one print-ready file for the whole selection, handy for handing a stack of picking slips to the warehouse. Export All downloads the current view respecting both your filters and your column selection:
- Apply your filters and select the columns you want (manage columns).
- Press Export All - the export respects current filters and column selection.
What you can do on this page
Every action on this page, step by step. What you see depends on your role, so a control your account is not set up for simply does not appear.
Actions on a single record
These appear in the row's actions menu and on the record page, and only when the record's current state allows them:
- Assign Invoice To Driver - hands the order to a delivery driver, who then sees it in the driver app.
- Cancel - voids the document while keeping it on file for audit; stock and balances it touched are released.
- Create Consolidation Invoice - merges the selected documents into one consolidated invoice.
- Delivered - sets the delivery state to delivered.
- Dispatched - sets the delivery state to dispatched/out for delivery.
- Fulfill - marks the order as delivered/completed and commits the stock movement.
- Fulfill Paid Invoice - fulfills only invoices that are already fully paid - useful as a bulk step at end of day.
- Mark As Paid - settles the document without going through a payment gateway; use it for cash or off-system payment.
- Pay Commission - records the vendor's or agent's commission payout for this document.
- Processed - moves the record to processed.
Export the list
- Filter and choose your columns first - the export mirrors exactly what is on screen, not the whole table.
- Click Export All.
- The file downloads as a spreadsheet: one row per record, your visible columns in your order.
Full reference
Every option and control on this page, at a glance.
List columns
Also available: Amount, Barcode, Collection status, Currency, Currency code, Customer, Customer group, Delivery datetime, Delivery tag, Delivery type, Driver, Driver commission, Due, Format number, ID, Invoice number, Is commission paid, Is delivery, Is paid, Is returned, Note, Order status, Order status tag, Paid, Payment gateway, Payment method, Payment status tag, Platform name, POS session ID, Purchase order, Seller, Shipping address, Shipping method, Source, Status, Status tag, Type, Unpaid, UTM campaign, UTM content, UTM medium, UTM source, UTM term, VAT number
Expandable column groups: Customer, Incomes, Items - Each group expands to its own sub-columns in the manage-columns dialog.
Filters (46)
- Identity and numbering: Academic year ID, Barcode, Branch ID, Consolidation invoice ID, Coupon ID, Customer company ID, Customer ID, Driver ID, Format number, Gateway ID, ID, Ids, Not in consolidation invoice, Number, Order number, Paid, Payment ID, POS branch ID, POS session ID, POS user ID, Product ID, Shipping method ID, Track ID, User ID
- Dates and periods: From date, From delivery date, From delivery time, From payment due, Invoice date, To date, To delivery date, To delivery time, To payment due
- Money and payment: Collection status, Payment status, Same company currency
- Location and delivery: Area, City, Country
- Status and flags: ETA status, Has extra expenses, Order status, Platform, Source, Status
- Other: Purchase order
Record actions
- Assign Invoice To Driver
- Cancel
- Create Consolidation Invoice
- Delivered
- Dispatched
- Fulfill
- Fulfill Paid Invoice
- Mark As Paid
- Pay Commission
- Processed
Sortable columns
Delivery date time, Delivery tag text, Order status tag, Payment status tag text
Standard list tools
Every list page in OSOSS shares these controls:
- Manage columns - the icon at the right edge of the header row: search columns, tick to show or hide, drag to reorder. Your selection persists for your user.
- Quick search - matches the page's primary field.
- Filter chips + More Filters - the chips are your defaults; More Filters exposes the full set below.
- Save Filter / Saved Filters - name a filter combination and recall it in one click; one can be your default view.
- Reset - clears filters back to defaults.
- Export All - downloads the current filtered rows with exactly the columns you have selected.
- Focus - hides the surrounding chrome for a full-width table.
- Row selection - the header checkbox selects the page or all matching rows, enabling bulk actions.
- Rows per page and page jumper - at the foot of the table.
- Custom fields - anything you define under Settings > Custom Fields appears here as both a column and a filter.