
Payments
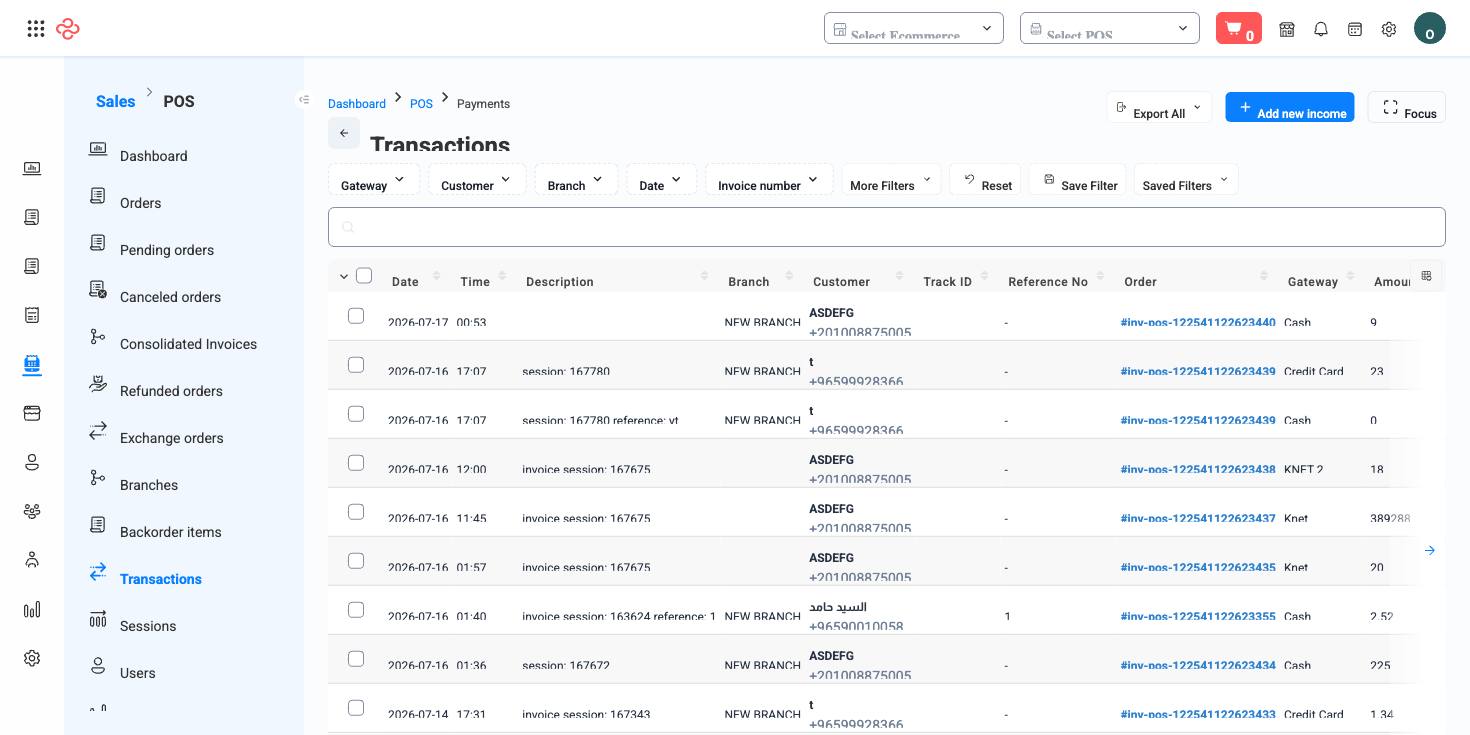
Payments shows the money side of your online store: every payment collected against a website order, in one list. Where the Orders screen answers "what did we sell and has it shipped?", this screen answers "what did we actually get paid, when, and through which method?" - the view you need for daily reconciliation against your payment gateway and cash collections.
Menu path: Sales > Website > Payments
URL: https://my.ososs.com/dashboard/pos/payments
How payments relate to orders
An order and its payments are separate records, because they rarely move together one-to-one:
| Situation | What you see here |
|---|---|
| Customer pays online at checkout | One payment, created with the order |
| Cash on delivery | The payment appears when the driver collects and it is recorded |
| Partial payments | Several payment rows against the same order, each with its own date and amount |
| Refund | The reversal is traceable back through the original order |
This is why the payments list is the right place for reconciliation: it reflects money movements, not sales events. An order counted in today's sales may have its payment recorded tomorrow - and this screen shows it on the day the money actually moved.
Review a payment
- Find the payment in the list - use the filters to narrow by date or other criteria.
- Open the record to see its full details: the amount, method, date, and the order it settles.
- Follow the link back to the order when you need the sale's context - items, customer, delivery.
Daily reconciliation workflow
- Filter the list to yesterday's date.
- Use the manage-columns icon (right edge of the header row) to show the columns your accountant needs - amount, method, date, and reference.
- Press Export All - the export respects your current filters and column selection.
- Match the export against your gateway settlement report and driver cash handovers. Anything unmatched is your exception list for the day.
List tools
The screen carries the standard OSOSS list toolkit: quick filters, saved filters, manage columns, Export All, focus mode, and rows-per-page with a page jumper for stepping through long periods.
What you can do on this page
Every action on this page, step by step. What you see depends on your role, so a control your account is not set up for simply does not appear.
Open and read a record
- Click the row, or choose View in the row's actions menu.
- The detail page shows the record's own fields, its related documents, and the actions that apply to it in its current state.
- Use the breadcrumb or your browser's back button to return - your filters, sort, and page position are preserved.
Export the list
- Filter and choose your columns first - the export mirrors exactly what is on screen, not the whole table.
- Click Export All.
- The file downloads as a spreadsheet: one row per record, your visible columns in your order.
Full reference
Every option and control on this page, at a glance.
Standard list tools
Every list page in OSOSS shares these controls:
- Manage columns - the icon at the right edge of the header row: search columns, tick to show or hide, drag to reorder. Your selection persists for your user.
- Quick search - matches the page's primary field.
- Filter chips + More Filters - the chips are your defaults; More Filters exposes the full set below.
- Save Filter / Saved Filters - name a filter combination and recall it in one click; one can be your default view.
- Reset - clears filters back to defaults.
- Export All - downloads the current filtered rows with exactly the columns you have selected.
- Focus - hides the surrounding chrome for a full-width table.
- Row selection - the header checkbox selects the page or all matching rows, enabling bulk actions.
- Rows per page and page jumper - at the foot of the table.
- Custom fields - anything you define under Settings > Custom Fields appears here as both a column and a filter.