
WhatsApp Templates
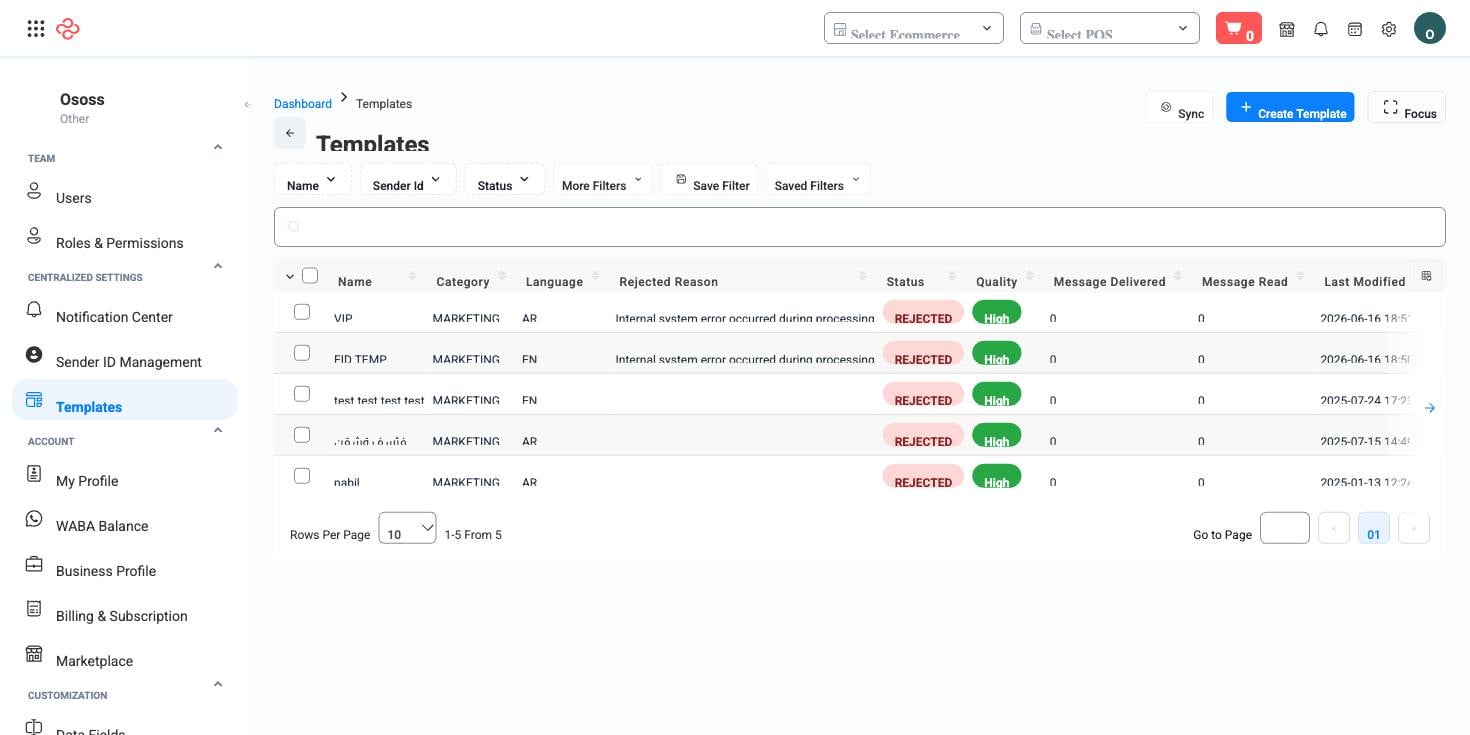
A WhatsApp template is a pre-approved message layout that your campaigns send to customers. WhatsApp requires every business-initiated message to use an approved template - you cannot simply type a free-form broadcast - so this screen is where you track the templates registered for your account, their approval status, and where each one may be used.
Menu path: Marketing > WhatsApp > Templates
URL: https://my.ososs.com/dashboard/templates
How templates work
A template defines the fixed text of a message, its language, and its category (for example, marketing or utility). Before a template can be used in a campaign, it goes through WhatsApp's review process. The status column tells you where each template stands:
| Status | Meaning |
|---|---|
| Pending | Submitted and waiting for WhatsApp's review |
| Approved | Ready to use in campaigns |
| Rejected | Declined by WhatsApp - the content must be revised and resubmitted |
Each template is also tied to a sender ID - the identity the message is sent from - and to a use in context that determines which flows (campaigns, notifications) can pick it. Sender identities themselves are managed on the Sender ID Management page.
Reading the list
The list shows your templates with their name, language, category, sender ID, source, and status. Use the manage-columns icon at the right edge of the header row to add, remove, or reorder columns, and the rows-per-page and page-jumper controls to move through long lists.
Seven filters help you narrow the view: category, language, name, sender id, source, status, and use in. A combination you use often - say, approved marketing templates in Arabic - can be kept with Save Filter so it is one click away next time.
Review templates before a campaign
- Go to Marketing > WhatsApp > Templates.
- Filter status to Approved and language to the language of your campaign.
- Confirm the template's sender ID matches the identity you want customers to see.
- If nothing suitable exists, register a new template (through your sender ID setup) and wait for approval before scheduling the campaign.
Export the current view
- Apply your filters and select the columns you want (manage columns).
- Press Export All - the export respects the current filters and column selection, so what you see is what you download.
What you can do on this page
Every action on this page, step by step. What you see depends on your role, so a control your account is not set up for simply does not appear.
Export the list
- Filter and choose your columns first - the export mirrors exactly what is on screen, not the whole table.
- Click Export All.
- The file downloads as a spreadsheet: one row per record, your visible columns in your order.
Full reference
Every option and control on this page, at a glance.
Filters (7)
- Identity and numbering: Sender ID
- Products and stock: Category
- Status and flags: Source, Status
- Other: Language, Name, Use in
Standard list tools
Every list page in OSOSS shares these controls:
- Manage columns - the icon at the right edge of the header row: search columns, tick to show or hide, drag to reorder. Your selection persists for your user.
- Quick search - matches the page's primary field.
- Filter chips + More Filters - the chips are your defaults; More Filters exposes the full set below.
- Save Filter / Saved Filters - name a filter combination and recall it in one click; one can be your default view.
- Reset - clears filters back to defaults.
- Export All - downloads the current filtered rows with exactly the columns you have selected.
- Focus - hides the surrounding chrome for a full-width table.
- Row selection - the header checkbox selects the page or all matching rows, enabling bulk actions.
- Rows per page and page jumper - at the foot of the table.
- Custom fields - anything you define under Settings > Custom Fields appears here as both a column and a filter.