
Notification Center
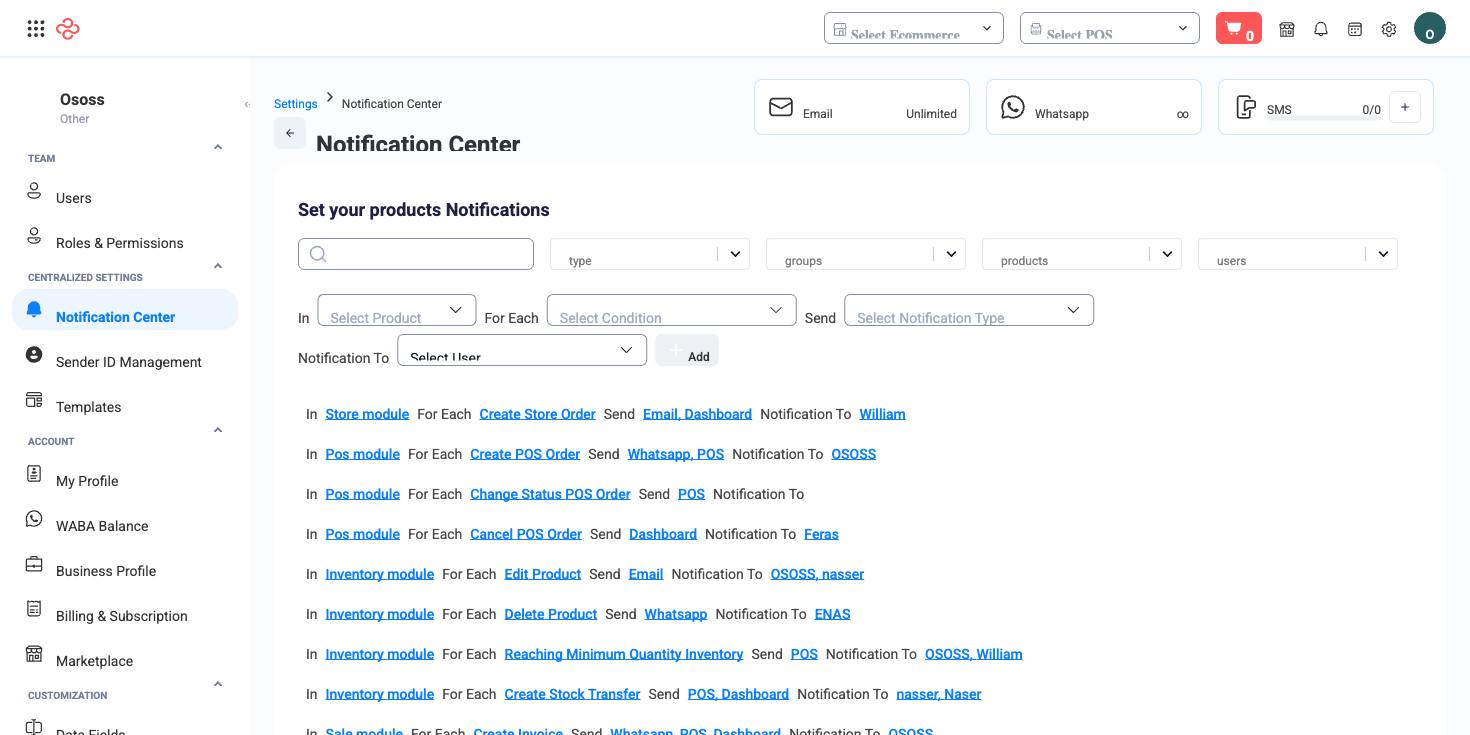
Notification Center is the switchboard for every automatic message OSOSS sends about your own business: which event, which channel, which person. Rather than hoping somebody notices a new order or a failed payment, you write a rule - when this happens in this module, tell these users this way - and the system does the noticing.
Menu path: Settings > Notification Center
URL: https://my.ososs.com/dashboard/general-settings/Notification-Center
How notification rules work
A rule has three parts: the module it watches, the action inside that module that fires it, and the users who should hear about it on one or more channels. Rules you have already created are listed under the builder, each one editable in place, and a rule starts working the moment you add it. Nothing is sent for events that happened before it existed.
| Channel | Where it arrives | Uses a balance |
|---|---|---|
| The user's mailbox | No, unlimited | |
| Dashboard | The bell inside the dashboard | No |
| Pos | The cashier's register screen | No |
| SMS | The user's phone, as a text message | Yes, your SMS balance |
| The user's WhatsApp | Yes, your WhatsApp balance |
The cards along the top of the page show those balances: e-mail is unlimited, while SMS and WhatsApp show used against purchased with a progress bar. The + on a card opens the packages drawer, where you choose a bundle and add it to your cart. A channel you have not subscribed to shows a card that links to the Marketplace instead - SMS and WhatsApp messaging are paid add-ons, activated from the Marketplace (paid add-on).
Write a rule
- Use the filter row first - the search box plus Type, Groups, Products and Users - to check that no rule already covers this event. Two rules on one action send two messages.
- In the builder, pick the product, which is the module the event belongs to, then the group inside it, then the action that should trigger the notification.
- Choose the users to notify. These are dashboard users, so the person has to exist under Users before you can route anything to them.
- Choose the channels and add the condition. It appears in the list below and is live immediately.
Keeping notifications worth reading
Notifications only work while they are still rare enough to be read, and the failure mode is not too few rules but too many. Send an event to a channel that matches how urgent it is: the dashboard bell for things you will handle today, e-mail for records and summaries, SMS or WhatsApp for the few events that must interrupt someone. Then review the list every few months and delete the rules nobody acts on. Because a rule names the users it notifies, a rule also becomes stale when the person leaves - checking the notification list is part of offboarding a team member.
Full reference
Every option and control on this page, at a glance.
Dialogs and drawers
- Notification Plans Drawer
Standard list tools
Every list page in OSOSS shares these controls:
- Manage columns - the icon at the right edge of the header row: search columns, tick to show or hide, drag to reorder. Your selection persists for your user.
- Quick search - matches the page's primary field.
- Filter chips + More Filters - the chips are your defaults; More Filters exposes the full set below.
- Save Filter / Saved Filters - name a filter combination and recall it in one click; one can be your default view.
- Reset - clears filters back to defaults.
- Export All - downloads the current filtered rows with exactly the columns you have selected.
- Focus - hides the surrounding chrome for a full-width table.
- Row selection - the header checkbox selects the page or all matching rows, enabling bulk actions.
- Rows per page and page jumper - at the foot of the table.
- Custom fields - anything you define under Settings > Custom Fields appears here as both a column and a filter.
Related pages
- Users - the people you can name as recipients
- Waba Balance - your WhatsApp Business balance in detail
- Senderidmanagement - the sender name your SMS messages show
- Notification Phone Numbers - the numbers used for outgoing messages
What you can do on this page
Every action on this page, step by step. What you see depends on your role, so a control your account is not set up for simply does not appear.
Delete a record
- Open the row's actions menu and choose Delete.
- Confirm in the dialog. There is no undo from the interface.
- If the record is referenced elsewhere - used on a document, tied to a transaction - the delete is refused and the reason shown.
Export the list
- Filter and choose your columns first - the export mirrors exactly what is on screen, not the whole table.
- Click Export All.
- The file downloads as a spreadsheet: one row per record, your visible columns in your order.